
SHOULDER INJURY PREVENTION: PART 2
SHOULDER INJURY PREVENTION: PART 2
By Brandon Penas, PT
Pitching Mechanics and the Underdeveloped Pitcher
When it comes to injury prevention and the underdeveloped pitcher, pitching mechanics should be the first line of defense. However, more often than not, this is “easier said than done” when attempting to either teach or learn the important components of the pitching motion. Oftentimes, players are more obsessed with velocity and developing off speed pitches too early, and are rarely instructed in proper mechanics at an early age. The lack of knowledge and skill in this particular area by coaches and/or parents plays a considerable role in the inability to identify of poor mechanics. The development of poor throwing mechanics over a prolonged period of time can be difficult to change and can lead to both shoulder and elbow injury at any age. In this article, I will discuss pitcher evaluation tools, break down the mechanics of pitching, and provide suggestions and drills to improve as a pitcher.
Section 1: Pitcher Evaluation
There are several aspects of the pitching game that are assessed by college coaches and pro scouts in determining the quality of a pitcher. Such aspects include command, movement, velocity, athleticism, competitiveness, and depth. However, the pitcher’s ability to reproduce his delivery will determine his long term pitch-ability. The following topics are all assessed in one way, shape, or form by college coaches and pro scouts in determining the quality of pitchers. Arm motion, arm slot, and lower half mechanics will be discussed in greater detail.
Arm Motion
Arm motion is, more than likely, the first thing a pitcher is evaluated on because it will determine if there is any potential for gains in velocity and the likelihood of future arm injuries. There are multiple types of arm motions that are taught by pitching experts and coaches including the inverted L, inverted W, and others. As a pitcher, I used an arm motion known as the down-back-up arm motion, which will be the only arm motion discussed in this article.
The down-back-up arm action is generally a slower arm motion, which requires proper timing to be effective. This action is initiated by the throwing hand dropping down as the hands separate and it extends into a long arc until it reaches its highest point (generally with the ball facing between first and second base for left-handed pitchers, and between 2nd and 3rd base for right-handed pitchers). Once the hand reaches its apex, the shoulder will rotate and progress into the pitcher’s arm slot. This type of arm motion requires good timing because the length of the arm path creates more opportunities for mechanical flaws, which can affect timing at the point of release.
A general guideline to follow regarding arm motion is to make the entire motion look natural, effortless, and the pitcher should be able to demonstrate reproducibility.
Arm Motion
Arm slot, or the angle of the arm relative to the body at the point of release, is just as important as the pitcher’s arm motion. Typically, there are three different arm slots including: 12 o’clock, 3/4 arm slot, and side arm or submarine. Each arm slot has its advantages and disadvantages, which will be discussed briefly.
The 12 o’ clock arm slot is the most difficult to master; however, there is a distinct advantage to this arm slot as it allows the pitcher to throw at a increased downhill angle due to the high point of release. The release point for this particular arm slot has a very small margin of error; therefore, pitchers tend to miss high and low with their pitches.
The other extreme in arm slots is the side arm slot, which provides two distinct advantages including increased movement on the fastball and increased deception.
In between the 12 o’ clock and sidearm arm slots is the 3/4 arm slot. This arm slot is thought to be the most advantageous as it allows the pitcher to have a well-balanced delivery and increased control on direction and rotation. Moreover, this arm slot still allows the pitcher to throw the fastball on a downhill plane, and also allows the pitcher to use a vertical plane when throwing the curve ball.
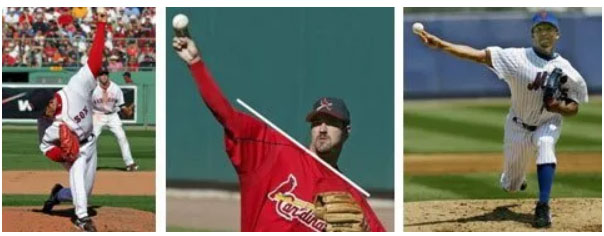
Picture 1: Hideki Okajima and the; Picture 2: Jeff Suppan and the 3/4 arm slot; Picture 3: Pedro Martinez/sidearm slot 12 o’ clock arm slot
Lower Half Mechanics
As previously mentioned in part one of this series, the lower extremities and torso produce greater than 50% of the kinetic energy needed while pitching. That being said, lower extremity foot work and mechanics should always be addressed.
Plant/pivot leg- the pitcher should think “back side tall” with a slight bend in the plant/pivot knee. This will maintain a proper downhill plane posture. Some pitchers use the “dip and drive” method to produce increased velocity. Leg Kick- should be lifted to at least 90° with a slight rotation toward second base in order to engage the hips and increase torque during the delivery. Stride Leg – the stride leg should progress directly toward home plate/intended target and should not swing through the delivery as this can cause the hips to fly open, which leads to decrease velocity and increased strain on the throwing shoulder. Also, the stride leg should have some knee flexion (knee bend) in it in order to provide increased stability. Foot Plant – the plant foot should land closed, and thus the hips remain closed. If the plant foot lands open so do the hips, which will lead to the pitcher missing up and away more often than not.
Section 2: Breaking Down Pitching Mechanics
The terminology used to describe the stages of throwing differs throughout the literature, among pitching experts, coaches, etc. In this article, I’ll use the terminology as it was taught to me by the former Nebraska pitching coach and current head coach of the Texas A&M baseball program, Coach Rob Childress.
1) Rocker step – when starting in the wind up, the pitcher steps backward with their glove side leg at ~45° angle from the rubber.
2) Pivot step – the pitcher externally rotates his arm side leg so that the foot is parallel with the rubber.
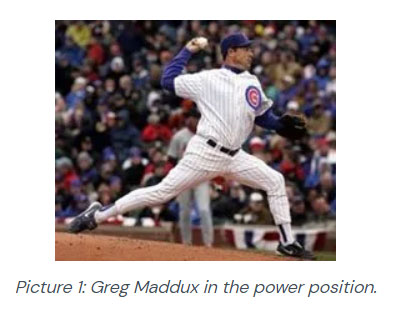
3) Balance point – the glove side leg is raised to roughly 90° of hip flexion (some pitchers go well above 90°) with the glove and ball above and slightly behind the elevated thigh. The hands should be lowered and “broke” over the glove side leg as it simultaneously starts to progress toward the plate and into the power position.
4) Power position – from the balance point to the power position, the pitcher’s stride leg extends toward home plate, landing with his foot slightly closed and on the ball of his foot. At the same time, the pitcher’s arm should be in the cocking-phase with his fingers on top of the baseball and the ball facing somewhere between 1st and 2nd base for lefties, and 2nd and 3rd base for righties. Also, the throwing elbow should be at or slightly above shoulder level.
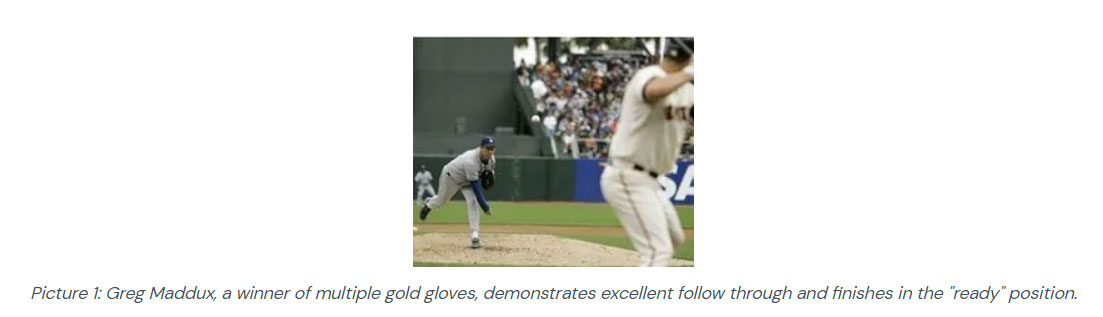
Follow Through – the pitcher should finish on the balls of his feet with his throwing arm hanging over his opposite thigh and glove ready to field his position.
Section 3: Suggestions and Drills
Pitching from the stretch
Working on pitching mechanics from the stretch can be a useful tool when it comes to timing and rhythm. When pitching from the windup, young pitchers tend to speed through their delivery. This is commonly referred to as “rushing”. When this takes place the pitcher’s body will have a tendency to get ahead of his arm. The result will be a loss of command, especially high and to the armside of the intended target. This results from the pitchers front foot landing well before the throwing arm has a chance to be launched into the throwing slot which can greatly affect the timing of the delivery.
Pitching from the arm side of the rubber
Pitching is merely a game of multiple planes and angles, from your starting position on the rubber to offspeed pitches to different arm slots. One subtle change a pitcher can make in order to gain an advantage on hitters is to pitch from the arm side half of the rubber. For example, a right handed pitcher should set up on the right half of the rubber. Why you may ask? Setting up on the right half of the rubber provides a better throwing angle into left handed hitters and allows him to use his arm side run to his advantage against both left handed and right handed hitters. Due to the pronatory behavior of the forearm upon release, pitchers produce natural “tailing away” movement on their fastball. When coupled with a two-seam fastball there is an increased effect. That being said, when a RHP is pitching to a right handed hitter the movement of the fastball will be directed inward and the hitter’s ability to adjust in order to hit the baseball will be more difficult.
Pitcher Throwing Progressions
1) Flip Drill – the flip drill is used primarily for warming up the wrist and is the first drill in the throwing progression. Position yourself in 1/2 kneeling on your armside leg and your partner roughly 10 feet in front of you. Perform 10-15 flips or until loose.
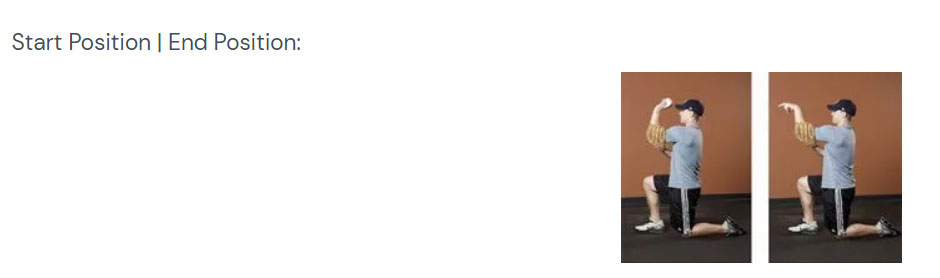
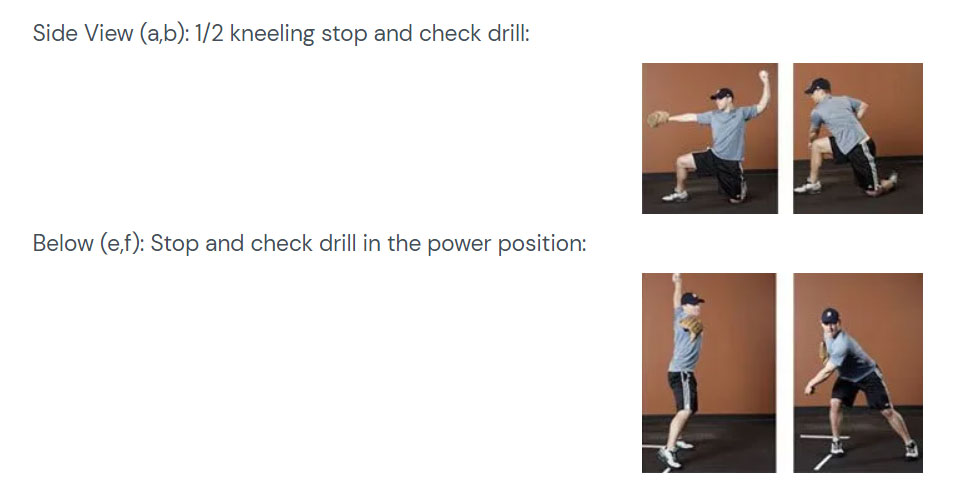
2) Stop and Check Drill (half-kneeling and power position) – the stop and check drill is used to “force” the pitcher to “stop and check” both his elbow and ball position and ensure his glove is directed at his target and he’s utilizing frontside leverage to progress to follow through. Allow roughly 30 feet in between you and your partner and complete 10-15 throws each.
3) Skip, Stop, and Check Drill – this is the third drill in the progression. This drill is nearly a duplicate of the stop and check drill in the power position (pictures e and f above) with the only thing that’s different is the “skip”. In the pictures below, the “skip” occurs after obtaining the position in the second picture in which the pitcher will “skip” on his armside leg in a forward direction and then stop in the power position (picture 3) and check his elbow and ball position, and progress to the follow through. Position your partner roughly 60-75 feet in front of you and complete 10-15 throws.
Summary
In order to develop sound pitching mechanics a pitcher must be properly informed, put in the necessary work to achieve rhythm and reproducibility, and learn and understand the game of pitching in order to be a successful pitcher. Coaches and parents must remember that pitching mechanics should not be a “cookie-cutter” mentality; however, they should attempt to modify the pitcher’s faulty mechanics without attempting to revamp his entire delivery.
References:
1. O’Leary, Chris. The pitching mechanic. Pictures of Greg Maddux, Jeff Suppan, Hideki Okajima, and Pedro Martinez. www.chrisoleary.com/projects/Baseball/Pitching/ThePitchingMechanic/index.html


Leave a Reply
Want to join the discussion?Feel free to contribute!