FORE CRYING OUT LOUD

FORE CRYING OUT LOUD

Keep your head down!

While it’s down there, you may want to take a look at your feet. It’s been my experience that most golfers only notice their feet when addressing the ball or if they’re sore enough to end a round. Truth be told, there is no more important part of the body during the swing than your “dogs.” If your feet are not properly aligned during key points of the swing you will lose both distance and accuracy.

What are potential causes of poor foot alignment? Often times poor trunk and hip flexibility cause a top-down reaction that changes the foot’s position. This position change, in turn, causes key force-producers in the hips to shut down. From there any number of unfavorable outcomes can ensue…power loss, hitting thin, slicing…you name it. Other times, the feet are simply misaligned and require a custom footbed/orthotic to allow them to meet the ground properly.

Which of these scenarios is contributing to your stalled handicap? Chances are both are a factor. However, it would be best to have a physical therapist assist you in deciding exactly what your problems are and how to correct them. Being highly trained in both foot/ankle biomechanics and flexibility assessment, the physical therapists at Endurance Rehabilitation can help you start shaving strokes off your score today.

FORE-SEEABLE TROUBLE

FORE-SEEABLE TROUBLE

As spring approaches and duffers like me decide to come out of golfing hibernation, it is times like this that we tend to see a rise in orthopedic overuse injuries. Now I know that many of you have read in the multiple golfing magazines about “Improving Core strength will add 15 yards to your drive.” Or “battling back pain.” I figured that I would bring to light one of the injuries that do not get much attention. Maybe it’s due to its association with its other country club counterpart, but lateral epicondylitis or “Tennis Elbow” can be a real pain literally and figuratively if not dealt with properly.

Lateral epicondylitis is an inflammatory condition that is associated with the wrist extensors and rears its ugly head at the lateral epicondyle or common extensor tendon; this is the little knobby bone located on the outside of your elbow. The risk of overuse injury is increased 2-3 times in those who perform repetitive motions (i.e. swinging a golf club) more than 2 hours of play per week and 2-4 times in players older than 40 years. Much of this comes down to improper technique, decreased flexibility and decreased strength. With golf, the most likely location of injury is at the left lateral epicondyle of a right handed golfer due to the increased demands for stability at impact of the ball – and the ground!

Lateral epicondylitis begins as micro-trauma to the common extensor tendon which can lead to symptoms of severe, burning pain on the outside part of the elbow. In most cases, the pain starts in a mild and slow fashion and can gradually worsens over weeks or months. The pain can be made worse by pressing on the outside part of the elbow or by gripping or lifting objects. Lifting even very light objects (such as a small book or a cup of coffee) can lead to significant discomfort. In more severe cases, pain can occur with simple motion of the elbow joint while in severe cases, the pain can radiate to the forearm.

Treatment is simple, be proactive! At the earliest onset or knowledge of symptoms, its best to begin utilizing ice and an over the counter Ibuprofen, this will help to minimize the inflammatory response. Stretching of the forearms is appropriate to maintain flexibility and decrease the soft tissue restrictions that become present from your body’s production of scar tissue at the injury site. Scar tissue is the body’s mechanism for patching up injuries; the problem lies in that when it is laid down your body does so in a very haphazard manner. This leads to the fibers of the tissue being very chaotic, and thus a decreased tensile strength of that tendon and a high likelihood of re-injury. If you have had no success at palliative care independently, it is time to visit your physical therapist for more aggressive treatments and a comprehensive rehabilitative program that will address strength, flexibility and improve tissue integrity via ASTYM that will have you back on your way to qualifying for the next U.S. Open.

EXERCISING IN THE SUMMER HEAT

EXERCISING IN THE SUMMER HEAT

It’s that time of year again. Summer has officially arrived. With rising temperatures it can become increasingly difficult to get out and enjoy outdoor exercise and to do without incidence.

Here are some general guidelines for enjoying some outdoor activities:

  • Hydrate, Hydrate, Hydrate. When exercising outdoors be sure to drink plenty of water. It has been recommended that you drink 24 oz of water for every hour you are exercising outdoor. Try to consume 4-6 oz every ten minutes. If you are thirsty your already dehydrated. Continue to hydrate throughout the day.
  • Exercise in the early hours of the day, get out before 10am. Allow yourself time to acclimate to the heat. Start out slowly 20-30 minutes of activity and increase time as your body gets used to exercising in the heat.
  • Limit sun exposure. Wear sunscreen, hat and sunglasses. Protect you skin from the sun’s harmful rays.
  • Wear performance fabrics, not cotton. These specially designed fabrics are created to wick perspiration. These fabrics help maintain your core body temperature.
  • Recovery. Be sure to stretch and continue to hydrate following activity.
  • Leave your pets at home in the air conditioning. Don’t forget that they are wearing fur coats and don’t have the ability to sweat.

These tips will permit you to continue to be active during these hot summer months and remain injury free!! So get out and enjoy our beautiful Valley of the Sun!!

WHAT TO DO WHEN STARTING A NEW PROGRAM

WHAT TO DO WHEN STARTING A NEW PROGRAM

When starting a running program there is always an adjustment period.

Sometimes we make the mistake of too much, too soon, too fast. Before starting a new running program I would recommend starting off with a new pair of running shoes. When shopping for a new pair of running shoes be sure to go to a running specific store, there are a few in the Valley. Take your usual running socks and orthotics to get the real feel. It is best to purchase shoes later in the day as our feet tend to swell as the day progresses.

When starting a running program it is best to start with a run – walk technique so your body can adjust to the impact that running imparts. Start with a reasonable goal. Some people like to run by time and others like to log their mileage. Either way keep it reasonable. An every other day basis is best to allow the body to recover and rebuild. Never increase by more than 10% each week. Also consider the terrain. For example tracks are softer than trails/canals are softer than asphalt is softer than concrete. Mix up the terrain.

The next thing is to make sure you take time to stretch out post run. Stretching should be considered part of your daily workout regime. It is important to stretch out all the major muscle groups that are used during running. Here are just a few stretches that I recommend:

  • Quadricep stretch – In standing lift you foot up behind you (heel to butt) and grap it w/ your hand. Keep the knee pointing to the ground and tuck your tail bone under.
  • Hamstring stretch – Lie on your back and lift your leg up and reach behind the thigh, and grab on. Take the heel up towards the sky and keep your opposite leg flat down and be sure not to arch your back.
  • Hip Flexor stretch – get into a 1/2 kneel position(one knee down on the ground and the other up w/ the foot on the ground). Tuck your tailbone/pelvis under and lean forward into the leg that has the knee on the ground. Lean until you feel a stretch and hold.
  • Calf stretch – stand on a curb or step and drop one heel towards the ground. Do a couple with the knee straight and a couple with the knee bent.

Hold each stretch for 30 seconds and do 2 repetitions on each leg. Time permitting do some upper body stretches etc…

Lastly, a little ice post run can help decrease that achy feeling. Ice for 20-30 minutes at a time. If needed take a little Ibuprofen to take the edge off.

If after trying all of the aforementioned your friend is still experiencing knee pain have her/him seek medical attention. Don’t let injuries linger, if there’s no improvement in 2 weeks it’s time to get it checked out.

Happy Trails!

PATELLOFEMORAL PAIN INCYCLING

PATELLOFEMORAL PAIN INCYCLING

Written by Nathan Koch

Endurance Rehabilitation

Patellofemoral pain (pain around the kneecap) is among the most common injuries that affect cycling performance. This is secondary to thousands of pedal revolutions in a fixed position. As a result, we speak in millimeters when evaluating the cyclist and bike position. Any slight deviation in the chain of movement and put undo stress on a joint. Ultimately causing the cyclist to lose efficiency and possibly create an overuse injury such as patellofemoral pain.

Patellofemoral pain is a global diagnosis that may include one or more of the following: patellofemoral syndrome, anterior knee pain, patellar tendinitis, patellar tendinosis, plica irritation, fat pad impingement, ITB friction syndrome, chondromalacia and subluxation. The specific diagnosis will describe the location of pain and the possible mechanism of pain. Typically, the cyclist will complain of vague knee pain or aches with minimal to no swelling and possibly popping or catching sensation around the kneecap. They will experience increased pain with squatting, ascending/descending steps (descending is typically worse) and getting up from prolonged sitting. On the bike, they will report generalized knee pain/stiffness that can be worse in cooler climates, worse with seated climbing, pushing big gears and often occurs after riding (particularly trying to get up from sitting on the days that they ride). Ultimately, it is important to determine what factors have caused dysfunction and subsequent pain.

A general understanding of patellofemoral anatomy and function is necessary in determining what factors can put you at risk for injury. The extensor mechanism of the knee (front of the thigh) consists of the quadriceps femoris, quadriceps tendon, patella, and patellar tendon. The hamstrings (the back of the thigh) provide dynamic control of flexion and extension of the knee as an opposite to the quadriceps. The VMO or vastus medialis obliques (inner portion) of the quadriceps is recognized as the primary medial stabilizer of the extensor mechanism and patellar alignment and is assisted by the hip adductors (groin muscles). The lateral (outer) dynamic forces acting on the patella are the iliotibial band (ITB), the lateral retinaculum, and the vastus lateralis (outer portion of the quad). The patella is the centerpiece of all the stabilizing forces. As these stabilizing forces act through the patella, a patellofemoral joint reactive force (PFJRF) is created by compression of the patella against the femur (thigh bone). The greater the tension generated by the quadriceps, the greater the resultant PFJRF. The PFJRF increased significantly with increased knee flexion (bending) such that at 15 degrees of flexion it is 1 x body weight; at 30 degrees, 2 x body weight; at 45 degrees, 3 x body weight; and at 75 degrees, 6 x body weight. From 20 degrees of flexion to full extension, little patellofemoral contact occurs. After 90 degrees of flexion, the center of the patella again does not articulate significantly with the trochlear groove. It is primarily in the mid ranges, from 30 to 90 degrees of flexion, where the patellofemoral contact areas are the greatest. During the pedal cycle, the knee goes through approximately 80 degrees of motion. The knee begins the power phase flexed about 110 degrees and extends to about 30 degrees of flexion. This is of great significance in cycling since most revolutions are performed when there is the greatest pressure on the patellofemoral joint. This can help explain why most cyclists have increased pain with seated climbing versus climbing out of the saddle. As a result we must keep this in mind when assessing bike fit and when designing a strength and flexibility program.

In order to further understand how the patellofemoral joint works on the bike you must understand how the hip and the foot and ankle influence function. Common hip/foot/ankle findings that can cause patellofemoral pain are: leg length discrepancy, wide pelvis, excessive or limited hip mobility, muscle weakness (particularly gluteals), excessive or limited ankle motion, foot pronation and/or flat feet and inflexibility. For example, while watching a cyclist ride you notice that he or she brushes the inside of their thigh or knee against the top tube. This abnormal hip and knee motion may be due to structural deformities, tight tensor fascia lata, imbalance in the strength and/or flexibility of the hip rotators, foot and ankle pronation or weakness of the gluteal and piriformis muscles. Clinically, measuring the quadriceps angle (Q angle) has been used by therapists and doctors to determine abnormal forces through the patella with respect to the hip. But there has been no consensus with respect to how this measurement should be taken. More importantly, this measurement is typically taken statically; therefore, the contribution of abnormal segmental motions and muscle activation to the Q angle during dynamic activities may not be appreciated. Therefore, in a cyclist, we must evaluate the patellofemoral joint along with the pelvis, hip, ankle and foot as they function together on the bike.

The patellofemoral joint functions on the bike based on the individual’s anatomical considerations described above, bicycle fit and pedaling/training techniques. Bike fit specifications that may cause patellofemoral pain are: low saddle, saddle to far forward, fore/aft cleat alignment, crank arm length, excessively rotated cleats and potentially even frame size and geometry. Look for signs of abnormal wear on the seat and cleats and re-evaluate any new additions to the bike that you have made recently. Remember that when making a change to the bike fit to reduce knee pain, you may cause a ripple effect and subsequent inefficiency or pain elsewhere. Always consult a trained professional if you are unsure. Training errors that may also contribute to pain are: low cadence/ pushing high gears, excessive duration, high intensity, excessive climbing, heavy weight training, plyometrics and an aggressive race schedule. There is significant research available demonstrating that heavy training loads and high mileage contribute substantially to knee injuries. Likewise, a rapid increase in training distance or intensity, seen in the early cycling season, also leads to overuse injuries.

In addition to changing your training program and bike fit there, are several other pain relieving techniques that can be instituted prior to seeking a medical specialist. Try the standard RICE protocol: rest or reduction in cycling (low resistance and high cadence), ice, compression and elevation. Avoid sitting with knee excessively bent, cross-leg sitting and prolonged squatting. In addition, perform a daily stretching routine that includes the entire lower extremity and use a foam roller or massage your legs. NSAIDS and analgesics (Biofreeze, Traumeel lotion and Arnica gel) can also be beneficial for reducing pain and inflammation. Core and lower extremity strengthening exercises are extremely important although if not designed and performed appropriately then further irritation may occur. If medical attention becomes necessary, the decision to treat the lower extremity needs to be based on a systematic biomechanical evaluation, in particular, a thorough analysis of bicycle fit and functional movements. This intensive evaluation should be performed by a sports medicine physical therapist or physician that traditionally works with cyclists. Cycling specific physical therapy for patellofemoral pain may include core/hip stability in all planes of movement, static and dynamic flexibility exercises, manual therapy techniques, lower extremity strengthening, neuromuscular re-education, patellar taping and cycling specific orthotics. Seek medical attention immediately if any one of the following occurs: moderate to severe swelling, persistent swelling, joint-locking, minimal to no change in pain with conservative treatment listed above, severe weakness, constant unrelenting pain or patella dislocating. If the pain starts during a critical period in your race season seek medical care immediately – fast results that allow us to endure is what we all strive for.

References
1. Asplund C, St.Pierre, P: Knee pain and bicycling. The Physician and Sportsmedicine 2004;32(4).
2. LaBotz M: Patellofemoral Syndrome. The Physician and Sportsmedicine 2004;32(7).
3. Powers C: The influence of altered lower-extremity kinematics on patellofemoral joint dysfunction: a theoretical perspective. J Orthop Sports Phys Ther. 2003;33(11).
4. Child D, Doucette S: The effect of open and closed chain exercise and knee joint position on patellar tracking in lateral patellar compression syndrome. J Orthop Sports Phys Ther. 1996; 23(2).
5. Press J, Kibler B, Herring S: Functional Rehabilitation of Sports and Musculoskeletal Injuries. Maryland, Aspen Publishers, 1998, pp 254-264.

SHOULDER INJURY PREVENTION: PART 3

SHOULDER INJURY PREVENTION: PART 3

By Brandon Penas, PT

Shoulder Strengthening for the Overhead Athlete

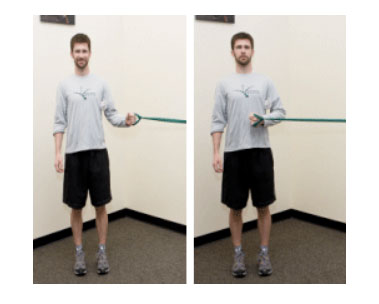
The stability of the shoulder (glenohumeral) joint is primarily derived from the four rotator cuff muscles, which are: Supraspinatus, Infraspinatus, Teres Minor (Picture 1), and Subscapularis (Picture 2). In the overhead athlete, this group of muscles must work in harmony and with precision in order to compress and stabilize the head of the humerus (head of upper arm bone) in the glenoid fossa (shoulder socket) while the shoulder is moving in multiple positions. Moreover, the rotator cuff provides a counterforce to humeral head superior translation (humerus moving upward) caused by deltoid muscle activity.

Lower Half Mechanics

Inefficient dynamic stabilization of the shoulder joint will, more than likely, lead to some form of shoulder injury over time. A proper strengthening and conditioning program for these specific muscles should be prescribed and implemented in all seasons in order to reduce the risk of injury. The following exercises are specifically designed to strengthen the rotator cuff as well as the upper, middle, and lower trapezius (not discussed in detail in this article). You will find the exercises under the muscle they are designed to strengthen.

Supraspinatus

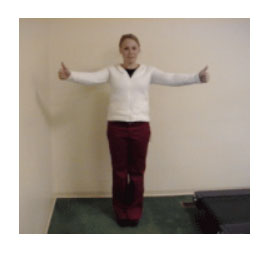
Full Can Exercise

Primary Rules: Starting at the pelvis, raise the arm to shoulder level keeping your thumbs pointing upward. Do not allow the shoulder to shrug upward during any part of this exercise.

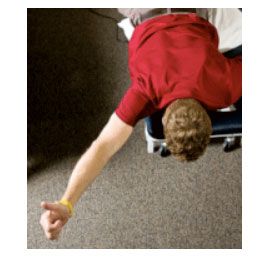
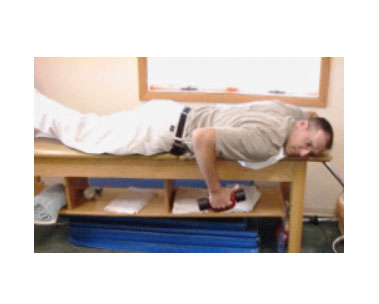
Prone Full Can Exercise

Primary Rules: Place a pillow underneath your hips to help protect your back. Look at the ground to protect your neck. Keep your shoulders from rising up towards your ears. Concentrate on squeezing your scapulas together.

Infraspinatus and Teres Minor

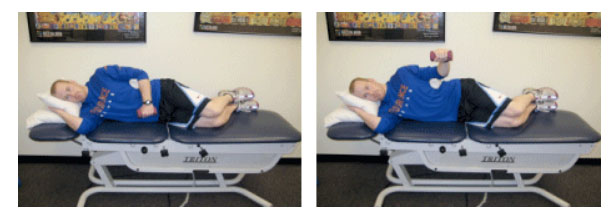
Side-lying External Rotation

Position 1: Squeeze towel roll down with elbow and keep elbow at 90 degrees at all times.
Position 2: Slowly lift hand while squeezing towel roll and not moving the shoulder backwards.

External Rotation

Primary Rules: Keep elbow at 90 degrees at all times during the above exercises. Always place a small towel roll between the arm and body just above the elbow.

Subscapularis

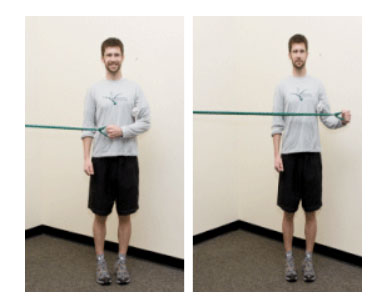
Standing Internal Rotation at 0 Degrees

Lower Trapezius

Prone Full Can

Primary Rules: Place a pillow underneath your hips to help protect your back. Look at the ground to protect your neck. Keep your shoulders from rising up towards your ears. Concentrate on squeezing your scapulas together.

Middle Trapezius

Prone Full Can Horizontal Abduction at 90 degrees

Primary Rules: Follow same rules with prone empty can exercise.

Prone Row

Primary Rules: Start with the arm at/near the floor, raise the arm up by bending at the elbow until the upper arm is level with the upper body and then return to starting position.

When strengthening the rotator cuff musculature, it is less important to perform the exercises to fatigue. Teyhen et al. published a research article in 2008 that assessed superior humeral head migration before and after rotator cuff fatigue (fatigue = 40% reduction in rotator cuff strength). At a 40% reduction in rotator cuff strength, the humeral head migrated superiorly by 0.79mm during shoulder elevation, which reduced the subacromial space (space the supraspinatus tendon travels through) up to 40% in healthy individuals (Teyhen, et. al, 2008). This level of fatigue diminishes the rotator cuff’s ability to dynamically stabilize the shoulder joint, thus putting the shoulder joint at risk for injury.

Guidelines/Recommendations for Exercise Implementation

Overhead athletes (especially pitchers) should perform rotator cuff exercises 3x/week during pre-season and in-season to maintain proper muscle strength and endurance, 1-2x/week during the off-season. Perform 2-3 sets of 15-20 repetitions per exercise unless technique/form is compromised. Performing these exercises independent of your sport-specific workout is ideal to ensure proper form and reduce the chance of generalized shoulder fatigue and muscle substitution. Quality not quantity is key!

For more information regarding this article, you can contact me via email at brandon@endurancerehab.com.

References


  • Deydre S.Teyhen, PhD, PT, OCS; Joseph M. Miller, MPT, PT; Tansy R. Middag, DPT; Edward J. Kane, PhD, PT, ECS, ATC. Rotator Cuff Fatigue and Glenohumeral Kinematics in Participants Without Shoulder Dysfunction. Journal of Athletic Training 2008;43(4):352-358.


SHOULDER INJURY PREVENTION: PART 2

SHOULDER INJURY PREVENTION: PART 2

By Brandon Penas, PT

Pitching Mechanics and the Underdeveloped Pitcher

When it comes to injury prevention and the underdeveloped pitcher, pitching mechanics should be the first line of defense. However, more often than not, this is “easier said than done” when attempting to either teach or learn the important components of the pitching motion. Oftentimes, players are more obsessed with velocity and developing off speed pitches too early, and are rarely instructed in proper mechanics at an early age. The lack of knowledge and skill in this particular area by coaches and/or parents plays a considerable role in the inability to identify of poor mechanics. The development of poor throwing mechanics over a prolonged period of time can be difficult to change and can lead to both shoulder and elbow injury at any age. In this article, I will discuss pitcher evaluation tools, break down the mechanics of pitching, and provide suggestions and drills to improve as a pitcher.

Section 1: Pitcher Evaluation

There are several aspects of the pitching game that are assessed by college coaches and pro scouts in determining the quality of a pitcher. Such aspects include command, movement, velocity, athleticism, competitiveness, and depth. However, the pitcher’s ability to reproduce his delivery will determine his long term pitch-ability. The following topics are all assessed in one way, shape, or form by college coaches and pro scouts in determining the quality of pitchers. Arm motion, arm slot, and lower half mechanics will be discussed in greater detail.

Arm Motion

Arm motion is, more than likely, the first thing a pitcher is evaluated on because it will determine if there is any potential for gains in velocity and the likelihood of future arm injuries. There are multiple types of arm motions that are taught by pitching experts and coaches including the inverted L, inverted W, and others. As a pitcher, I used an arm motion known as the down-back-up arm motion, which will be the only arm motion discussed in this article.

The down-back-up arm action is generally a slower arm motion, which requires proper timing to be effective. This action is initiated by the throwing hand dropping down as the hands separate and it extends into a long arc until it reaches its highest point (generally with the ball facing between first and second base for left-handed pitchers, and between 2nd and 3rd base for right-handed pitchers). Once the hand reaches its apex, the shoulder will rotate and progress into the pitcher’s arm slot. This type of arm motion requires good timing because the length of the arm path creates more opportunities for mechanical flaws, which can affect timing at the point of release.

A general guideline to follow regarding arm motion is to make the entire motion look natural, effortless, and the pitcher should be able to demonstrate reproducibility.

Arm Motion

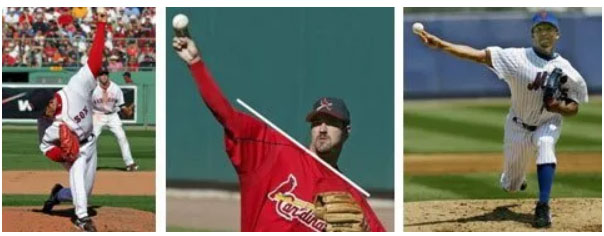
Arm slot, or the angle of the arm relative to the body at the point of release, is just as important as the pitcher’s arm motion. Typically, there are three different arm slots including: 12 o’clock, 3/4 arm slot, and side arm or submarine. Each arm slot has its advantages and disadvantages, which will be discussed briefly.

The 12 o’ clock arm slot is the most difficult to master; however, there is a distinct advantage to this arm slot as it allows the pitcher to throw at a increased downhill angle due to the high point of release. The release point for this particular arm slot has a very small margin of error; therefore, pitchers tend to miss high and low with their pitches.

The other extreme in arm slots is the side arm slot, which provides two distinct advantages including increased movement on the fastball and increased deception.

In between the 12 o’ clock and sidearm arm slots is the 3/4 arm slot. This arm slot is thought to be the most advantageous as it allows the pitcher to have a well-balanced delivery and increased control on direction and rotation. Moreover, this arm slot still allows the pitcher to throw the fastball on a downhill plane, and also allows the pitcher to use a vertical plane when throwing the curve ball.

Picture 1: Hideki Okajima and the; Picture 2: Jeff Suppan and the 3/4 arm slot; Picture 3: Pedro Martinez/sidearm slot 12 o’ clock arm slot

Lower Half Mechanics

As previously mentioned in part one of this series, the lower extremities and torso produce greater than 50% of the kinetic energy needed while pitching. That being said, lower extremity foot work and mechanics should always be addressed.

Plant/pivot leg- the pitcher should think “back side tall” with a slight bend in the plant/pivot knee. This will maintain a proper downhill plane posture. Some pitchers use the “dip and drive” method to produce increased velocity. Leg Kick- should be lifted to at least 90° with a slight rotation toward second base in order to engage the hips and increase torque during the delivery. Stride Leg – the stride leg should progress directly toward home plate/intended target and should not swing through the delivery as this can cause the hips to fly open, which leads to decrease velocity and increased strain on the throwing shoulder. Also, the stride leg should have some knee flexion (knee bend) in it in order to provide increased stability. Foot Plant – the plant foot should land closed, and thus the hips remain closed. If the plant foot lands open so do the hips, which will lead to the pitcher missing up and away more often than not.

Section 2: Breaking Down Pitching Mechanics

The terminology used to describe the stages of throwing differs throughout the literature, among pitching experts, coaches, etc. In this article, I’ll use the terminology as it was taught to me by the former Nebraska pitching coach and current head coach of the Texas A&M baseball program, Coach Rob Childress.

1) Rocker step – when starting in the wind up, the pitcher steps backward with their glove side leg at ~45° angle from the rubber.

2) Pivot step – the pitcher externally rotates his arm side leg so that the foot is parallel with the rubber.

3) Balance point – the glove side leg is raised to roughly 90° of hip flexion (some pitchers go well above 90°) with the glove and ball above and slightly behind the elevated thigh. The hands should be lowered and “broke” over the glove side leg as it simultaneously starts to progress toward the plate and into the power position.

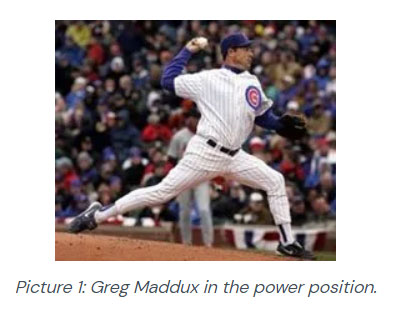
4) Power position – from the balance point to the power position, the pitcher’s stride leg extends toward home plate, landing with his foot slightly closed and on the ball of his foot. At the same time, the pitcher’s arm should be in the cocking-phase with his fingers on top of the baseball and the ball facing somewhere between 1st and 2nd base for lefties, and 2nd and 3rd base for righties. Also, the throwing elbow should be at or slightly above shoulder level.

Follow Through – the pitcher should finish on the balls of his feet with his throwing arm hanging over his opposite thigh and glove ready to field his position.

Section 3: Suggestions and Drills

Pitching from the stretch

Working on pitching mechanics from the stretch can be a useful tool when it comes to timing and rhythm. When pitching from the windup, young pitchers tend to speed through their delivery. This is commonly referred to as “rushing”. When this takes place the pitcher’s body will have a tendency to get ahead of his arm. The result will be a loss of command, especially high and to the armside of the intended target. This results from the pitchers front foot landing well before the throwing arm has a chance to be launched into the throwing slot which can greatly affect the timing of the delivery.

Pitching from the arm side of the rubber

Pitching is merely a game of multiple planes and angles, from your starting position on the rubber to offspeed pitches to different arm slots. One subtle change a pitcher can make in order to gain an advantage on hitters is to pitch from the arm side half of the rubber. For example, a right handed pitcher should set up on the right half of the rubber. Why you may ask? Setting up on the right half of the rubber provides a better throwing angle into left handed hitters and allows him to use his arm side run to his advantage against both left handed and right handed hitters. Due to the pronatory behavior of the forearm upon release, pitchers produce natural “tailing away” movement on their fastball. When coupled with a two-seam fastball there is an increased effect. That being said, when a RHP is pitching to a right handed hitter the movement of the fastball will be directed inward and the hitter’s ability to adjust in order to hit the baseball will be more difficult.

Pitcher Throwing Progressions

1) Flip Drill – the flip drill is used primarily for warming up the wrist and is the first drill in the throwing progression. Position yourself in 1/2 kneeling on your armside leg and your partner roughly 10 feet in front of you. Perform 10-15 flips or until loose.

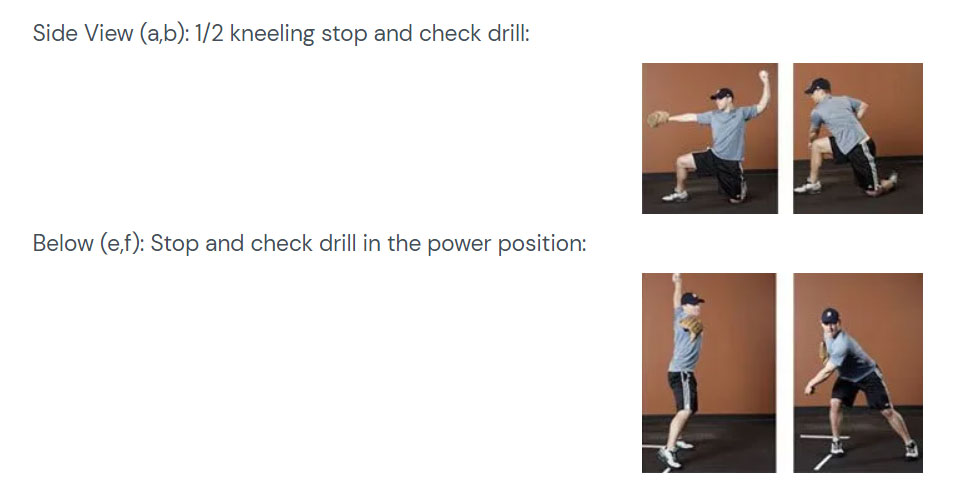
2) Stop and Check Drill (half-kneeling and power position) – the stop and check drill is used to “force” the pitcher to “stop and check” both his elbow and ball position and ensure his glove is directed at his target and he’s utilizing frontside leverage to progress to follow through. Allow roughly 30 feet in between you and your partner and complete 10-15 throws each.


3) Skip, Stop, and Check Drill – this is the third drill in the progression. This drill is nearly a duplicate of the stop and check drill in the power position (pictures e and f above) with the only thing that’s different is the “skip”. In the pictures below, the “skip” occurs after obtaining the position in the second picture in which the pitcher will “skip” on his armside leg in a forward direction and then stop in the power position (picture 3) and check his elbow and ball position, and progress to the follow through. Position your partner roughly 60-75 feet in front of you and complete 10-15 throws.

Summary

In order to develop sound pitching mechanics a pitcher must be properly informed, put in the necessary work to achieve rhythm and reproducibility, and learn and understand the game of pitching in order to be a successful pitcher. Coaches and parents must remember that pitching mechanics should not be a “cookie-cutter” mentality; however, they should attempt to modify the pitcher’s faulty mechanics without attempting to revamp his entire delivery.

References:

1. O’Leary, Chris. The pitching mechanic. Pictures of Greg Maddux, Jeff Suppan, Hideki Okajima, and Pedro Martinez. www.chrisoleary.com/projects/Baseball/Pitching/ThePitchingMechanic/index.html

SHOULDER INJURY PREVENTION: PART 1

SHOULDER INJURY PREVENTION: PART 1

By Brandon Penas, PT

Repetitive overhead throwing places significant mechanical stress on both the shoulder and elbow joint, which can lead to anatomic changes in the underdeveloped athlete. Shoulder and elbow joint injuries occur primarily due to the body’s inability to control motion segments throughout the body during the throwing/pitching delivery. Such lack of control, coupled with overuse, can lead to further structural damage in the throwing upper extremity. Therefore, coaches and parents must be able to recognize and prevent overuse in young children in order to avoid injury. Past and current research in overhead throwing injuries has focused primarily on the factors contributing to injury. Both intrinsic (age, race, gender) and extrinsic (pitch count, pitch type, showcase participation) factors have been included in such research. Although intrinsic factors are important, they are not modifiable; therefore, the modifiable, extrinsic factors will be discussed in further detail as they relate to injury.

Pitch Count

In 2001, Lyman et al. published a longitudinal study of shoulder and elbow pain in youth baseball pitchers between the ages 9-12. One area of interest related to the number of pitches thrown in games and throughout a season by youth pitchers. The results of the study showed a direct association: as the number of pitches during a game increased, the occurrence of shoulder pain increased. Moreover, a direct association was also discovered between the number of pitches thrown during the season and elbow pain among the same age group: as pitch count increased throughout the season, the occurrence of elbow pain increased4,5. Such research reiterates the importance of tracking the number of pitches thrown by young pitchers during games and the entire season. Pitch counts should pertain to “in competition” or “game intensity” pitches, and should strive to create single game, weekly, and annual pitch count limits for young pitchers. Table 1 presents a general guideline to follow as it relates to the player’s age and number of pitches per game:

Table 1: Age-Related Pitch Counts:

Age Pitches per Game
8 to 10 50
11 to 12 60
13 to 14 75
15 to 17 90

The number of pitches thrown will be different between starting pitchers and relievers. Relievers who throw multiple days per week should be kept on a weekly pitch count, and should avoid throwing more than two days in a row without a day of rest. Starting pitchers, on the other hand, should be kept on a “pitches per game” pitch count, and be allowed at least 3-4 days of rest in between games pitched. A gradual increase in pitch count limit should be allowed as the age and level of play of the athlete progresses. Remember, it’s the number of pitches that’s important, not the number of innings pitched!

Pitch Type

Every young pitcher wants to have a curveball like Barry Zito, a split finger fastball like Roger Clemens, or a slider like Randy Johnson. Having an off speed pitch in your “repertoire” as a young pitcher makes it easier to get underdeveloped hitters out. However, over time, early exposure to such pitches places an even greater demand on the immature throwing arm and can lead to joint pain and injury. Research indicates the curveball is the most dangerous and difficult pitch to learn, as it requires large forces and torques at the shoulder and elbow with significantly different mechanics than the fastball1,2. Early emphasis should be placed on proper mechanics of the fastball and change-up and progressed to include the importance of location and change of speed. Table 2 presents a general guideline to follow as it relates to the type of pitch thrown and at what age it should be incorporated:

Table 2: Age-Related Pitch Types

Pitch Type Age to Throw
Fastball 8
Change Up 10
Curveball 14
Slider 16
Split Finger 17

It’s important to remember that as the pitcher’s age and level of skill increase so do the forces at the elbow and shoulder joint with the pitching motion. Therefore, pitching mechanics and skill training are vital in overhead injury prevention, which will be discussed in greater detail in subsequent articles.

Strength and Conditioning

Although strength and flexibility of the throwing shoulder and elbow are important, core and leg strength and endurance also play an important role in determining a pitcher’s susceptibility to injury. Research has estimated that over 55% of the kinetic energy and momentum needed to throw a baseball comes from the legs and lower trunk6. The kinetic energy, or energy due to motion, begins in the lower extremities and is transferred through the trunk and throwing shoulder/arm throughout the pitching motion. Thus, if the pitcher’s legs and trunk begin to fatigue he/she produces less kinetic energy in the lower extremities and will rely on the shoulder to “make up” for the difference, which places added stress on the throwing shoulder/elbow. In an underdeveloped, underprepared, and overused pitcher, this state of fatigue can have unforgiving consequences. Most of today’s youth baseball players play multiple positions throughout the season. While some players excel as pitchers, they can’t pitch every game and, more importantly, need a break from pitching during the season! That being said, strength and conditioning programs for youth baseball players should aim to train the player both as a pitcher and position player simultaneously. Young baseball athletes should incorporate a well-balanced combination of strength, flexibility, endurance, and body awareness exercises/drills. Moreover, it’s important to expose these athletes to a stepwise progression related to age and avoid excessive training in only one area. Table 3 presents a general guideline to follow as it relates to the player’s age and strength training guidelines:

Table 3: Age-Related Strength Training Guidelines3

Age Group Strength Training Guidelines (based on age, maturity, experience)
7 or younger No weight resistance, body weight exercises only. Emphasize technique. Introduce Stretching. Make it FUN!
8 to 10 Core exercises emphasizing balance, proprioception. LIGHT resistance exercises. Scapular program. Keep it SIMPLE!
11 to 13 Progressive resistance exercises: bench, pulldowns, rows. Begin focus on rotator cuff and scapula. Core and lower extremity strengthening. Control volume to avoid overuse!
14 to 15 Total body focus with sport-specific training. Introduce plyometrics.
16 or older Advanced strengthening and flexibility. Thrower’s 10 program and plyometrics.

Seasonal Participation

Pitching outside of the player’s primary league (i.e. showcases, traveling teams, All-star tours) increases the number of pitches throw, thus increasing the risk of overuse injury. Coaches and parents should attempt to limit pitching to 9 months per year with at least 3 months off from pitching in order to decrease the risk of arm injury. At a young age it’s important to limit the pitcher to one team per season!

References
1. Elliott B, Grove JR, Gibson B, Thurston B: Three-dimensional cinematographic analysis of the fastball and curveball pitches in baseball. Int L Sport Biomech 1986; 2:20-28.
2. 2. Escamilla RF, Fleisig GS, Barrentine SW, Zheng N, Andrews JR: Kinematic comparisons of throwing different types of baseball pitches. J Appl Biomech 1998; 14:1-23.
3. Palleta, George. Injury Prevention and Treatment Techniques. Major League Baseball Medicine Conference. St. Louis, MO. January 3-5, 2008.
4. Lyman S, Fleisig GS, Waterbor JW, Funkhouser EM, Pulley L, Andrews JR, Osinski ED, Roseman JM. Longitudinal study of elbow and shoulder pain in youth baseball pitchers. Med Sci Sports Exerc., Vol 33, No 11 2001, pp. 1803-1810.
5. Lyman S, Fleisig GS, Andrews JR, Osinski ED: Effect of pitch type, pitch count, and pitching mechanics on risk of elbow and shoulder pain in youth baseball pitchers. AM J Sports Med 2002; 30:463-468.
6. Wilk, Kevin E: Restoration of Functional Motor Patterns and Functional Testing in the Throwing Athlete. Proprioception and Neuromuscular Control in Joint Stability. 2000:415-419.

SHOULDER INJURY PREVENTION IN THE OVERHEAD ATHLETE

SHOULDER INJURY PREVENTION IN THE OVERHEAD ATHLETE
By Brandon Penas, PT

Do you ever wonder how fast the human arm has to move in order to throw a baseball greater than 90 miles per hour? The answer: roughly 0.03 seconds from the cocking phase to ball release, thus making the overhead throwing motion one of the most violent, ballistic motions the human upper extremity undergoes. In the sport of baseball, the incidence of both elbow and shoulder injuries among professional and youth players is dramatically high due to the repetitive distraction, compression, and shear forces placed on the shoulder and elbow. In professional baseball, 50 percent of all injuries occur at the throwing shoulder (28%) and elbow (22%). Moreover, fifty percent of youth baseball players between the ages of 9-14 years old complain of shoulder or elbow pain with the number of severe, ligament-related injuries on the rise. In order to decrease the risk of injury, an overhead athlete’s body must be developed and consistently maintained year round.

This four-part series will examine and provide various solutions to the underlying factors that predispose athletes to injury associated with overhead throwing/pitching. The four areas that will be addressed include:

Part 1: Throwing Injury Prevention Guidelines for the Underdeveloped Pitcher

Part 2: Pitching Mechanics

Part 3: Shoulder strengthening for the Overhead Athlete

FIBROMYALGIA AND EXERCISE

FIBROMYALGIA AND EXERCISE

By Nathan Snell, PT, CSCS

Fibromyalgia is a disorder that causes pain in your muscles, joints and overall fatigue. People diagnosed with fibromyalgia have specific tender points on the body. These tender points are painful with applied pressure and typically found on specific places on the neck, shoulder, back, hips, arms and legs. Individuals diagnosed with fibromyalgia may also suffer from poor sleep, headaches, morning stiffness, numbness/tingling, problems with concentration and memory. Fibromyalgia affects as many as 1 in 50 Amercians and occurs more commonly in women than in men. The causes of Fibromyalgia are unknown.

Managing Fibromyalgia becomes a lifestyle change. There are a number of things you can do to help yourself feel better. These things include; exercise proper sleep habits, healthy diet, taking prescribed medications, and activity modification (keep the stress to a minimum).

Literature suggests that light, regular exercise can be very beneficial. Regular exercise may improve sleep and provide an outlet for stress. When considering an exercise program you want start easy to allow the body to adapt to the new stressors of exercise – the key is to not overdue it!! Here are some ideas:

Stretching: Gently stretch all your major muscle groups. Hold each stretch for 20 – 30 seconds and repeat each 2 times.

Aerobic Activity: Walking is a great place to start. Start easy 5 minutes on flat terrain. Slowly add 2-5 minutes daily until you can walk comfortably for 60 minutes. Once you build up to 60 minutes walk 3-4 times a week.

Aquatic exercise is great too! Get in the pool and walk forwards, backwards, side-to-side. Do squats in the shallow end. Grab a noodle to do a skiing motion with your legs, scissor or bicycle with your legs. Hold onto a kick board and just kick. You can purchase aquatic dumbbells and an aqua jogger at your local sporting goods store. The options are endless!! Start slowly – the water acts as resistance and set a timer, it’s easy to get carried away in the pool. Start with ten minutes the first day and perform every other day for a week and then add 5 minutes the next week.

Indoor Cycling: Start with 10 minutes at low resistance, add 5 minutes each session. Slightly increase your resistance once you can do 30 minutes continuously on the bike.

Other activities:

Yoga: try a beginner yoga class or one that focuses on relaxation and meditation. Again, start slow, try one class (30 minutes or less) and slowly build by completing a full class or adding a class a week.

T’ai Chi or Qigong Both of these activities focus on energy and quality of movement. Performing these activities require complete concentration and focus.

A few words of caution:

Always start slowly!! It’s important to allow yourself a day or two recovery when first starting out. It will permit you to evaluate how you’re feeling and how your body responded to the activity. Listen to your body.

Another thing to keep in mind is the temperature of the environment you are exercising in. Extreme temperatures should be avoided. Extremes can cause an exacerbation of the fibromyalgia. In the summer stay indoors for exercise, use the pool at the gym – it’s typically heated between 89-90 degrees. In the winter, exercise in warmer part of the day and cover up from the sun. Avoid excessive sun exposure.

Diet and exercise go hand-in-hand. Eat well! Avoid a lot of processed foods. Become a label reader. A nutritional label is on almost everything in the grocery store. Try to have healthy snacks (fruits, vegetables, yogurt etc…) on hand. Eat 5 small/ well balanced meals a day. Kicking caffeine may help too.

Keep a journal. Keeping a journal may help you determine patterns and pin point what causes your fibromyalgia to flare up. This will help you and your physician determine what treatments are best for you. Write down the number of hours you slept, rate your stress level (use a 0 – 10 scale), how well you ate, your mood (smiley faces work here), how much exercise you tolerated and how you felt after.

Lastly, find a good physician!! If you’re not getting what you need from your physician, find another one. The best way is to ask around – word of mouth works best. A team approach may be beneficial (i.e. a rheumatologist and a natropath). Also, it’s a good idea for you to keep a copy of any tests or treatments performed. This will help when seeing a new physician. Be informed!

Find what works for you and stick with it!!!!!